

Introduction
Welcome to the resources section of JotPro. Here, you’ll find a wealth of information designed to help you make the most of our AI-powered content generator.
Whether you’re looking to create unique and engaging content, generate stunning images, or streamline your content creation process, we’ve got you covered.
Our guides will walk you through the process, from selecting a template or generating a new document from scratch to receiving your high-quality, ready-to-publish results.
If you have any questions along the way, our FAQs are here to provide the answers. Dive in and discover how JotPro can help increase conversions and drive sales for your business.
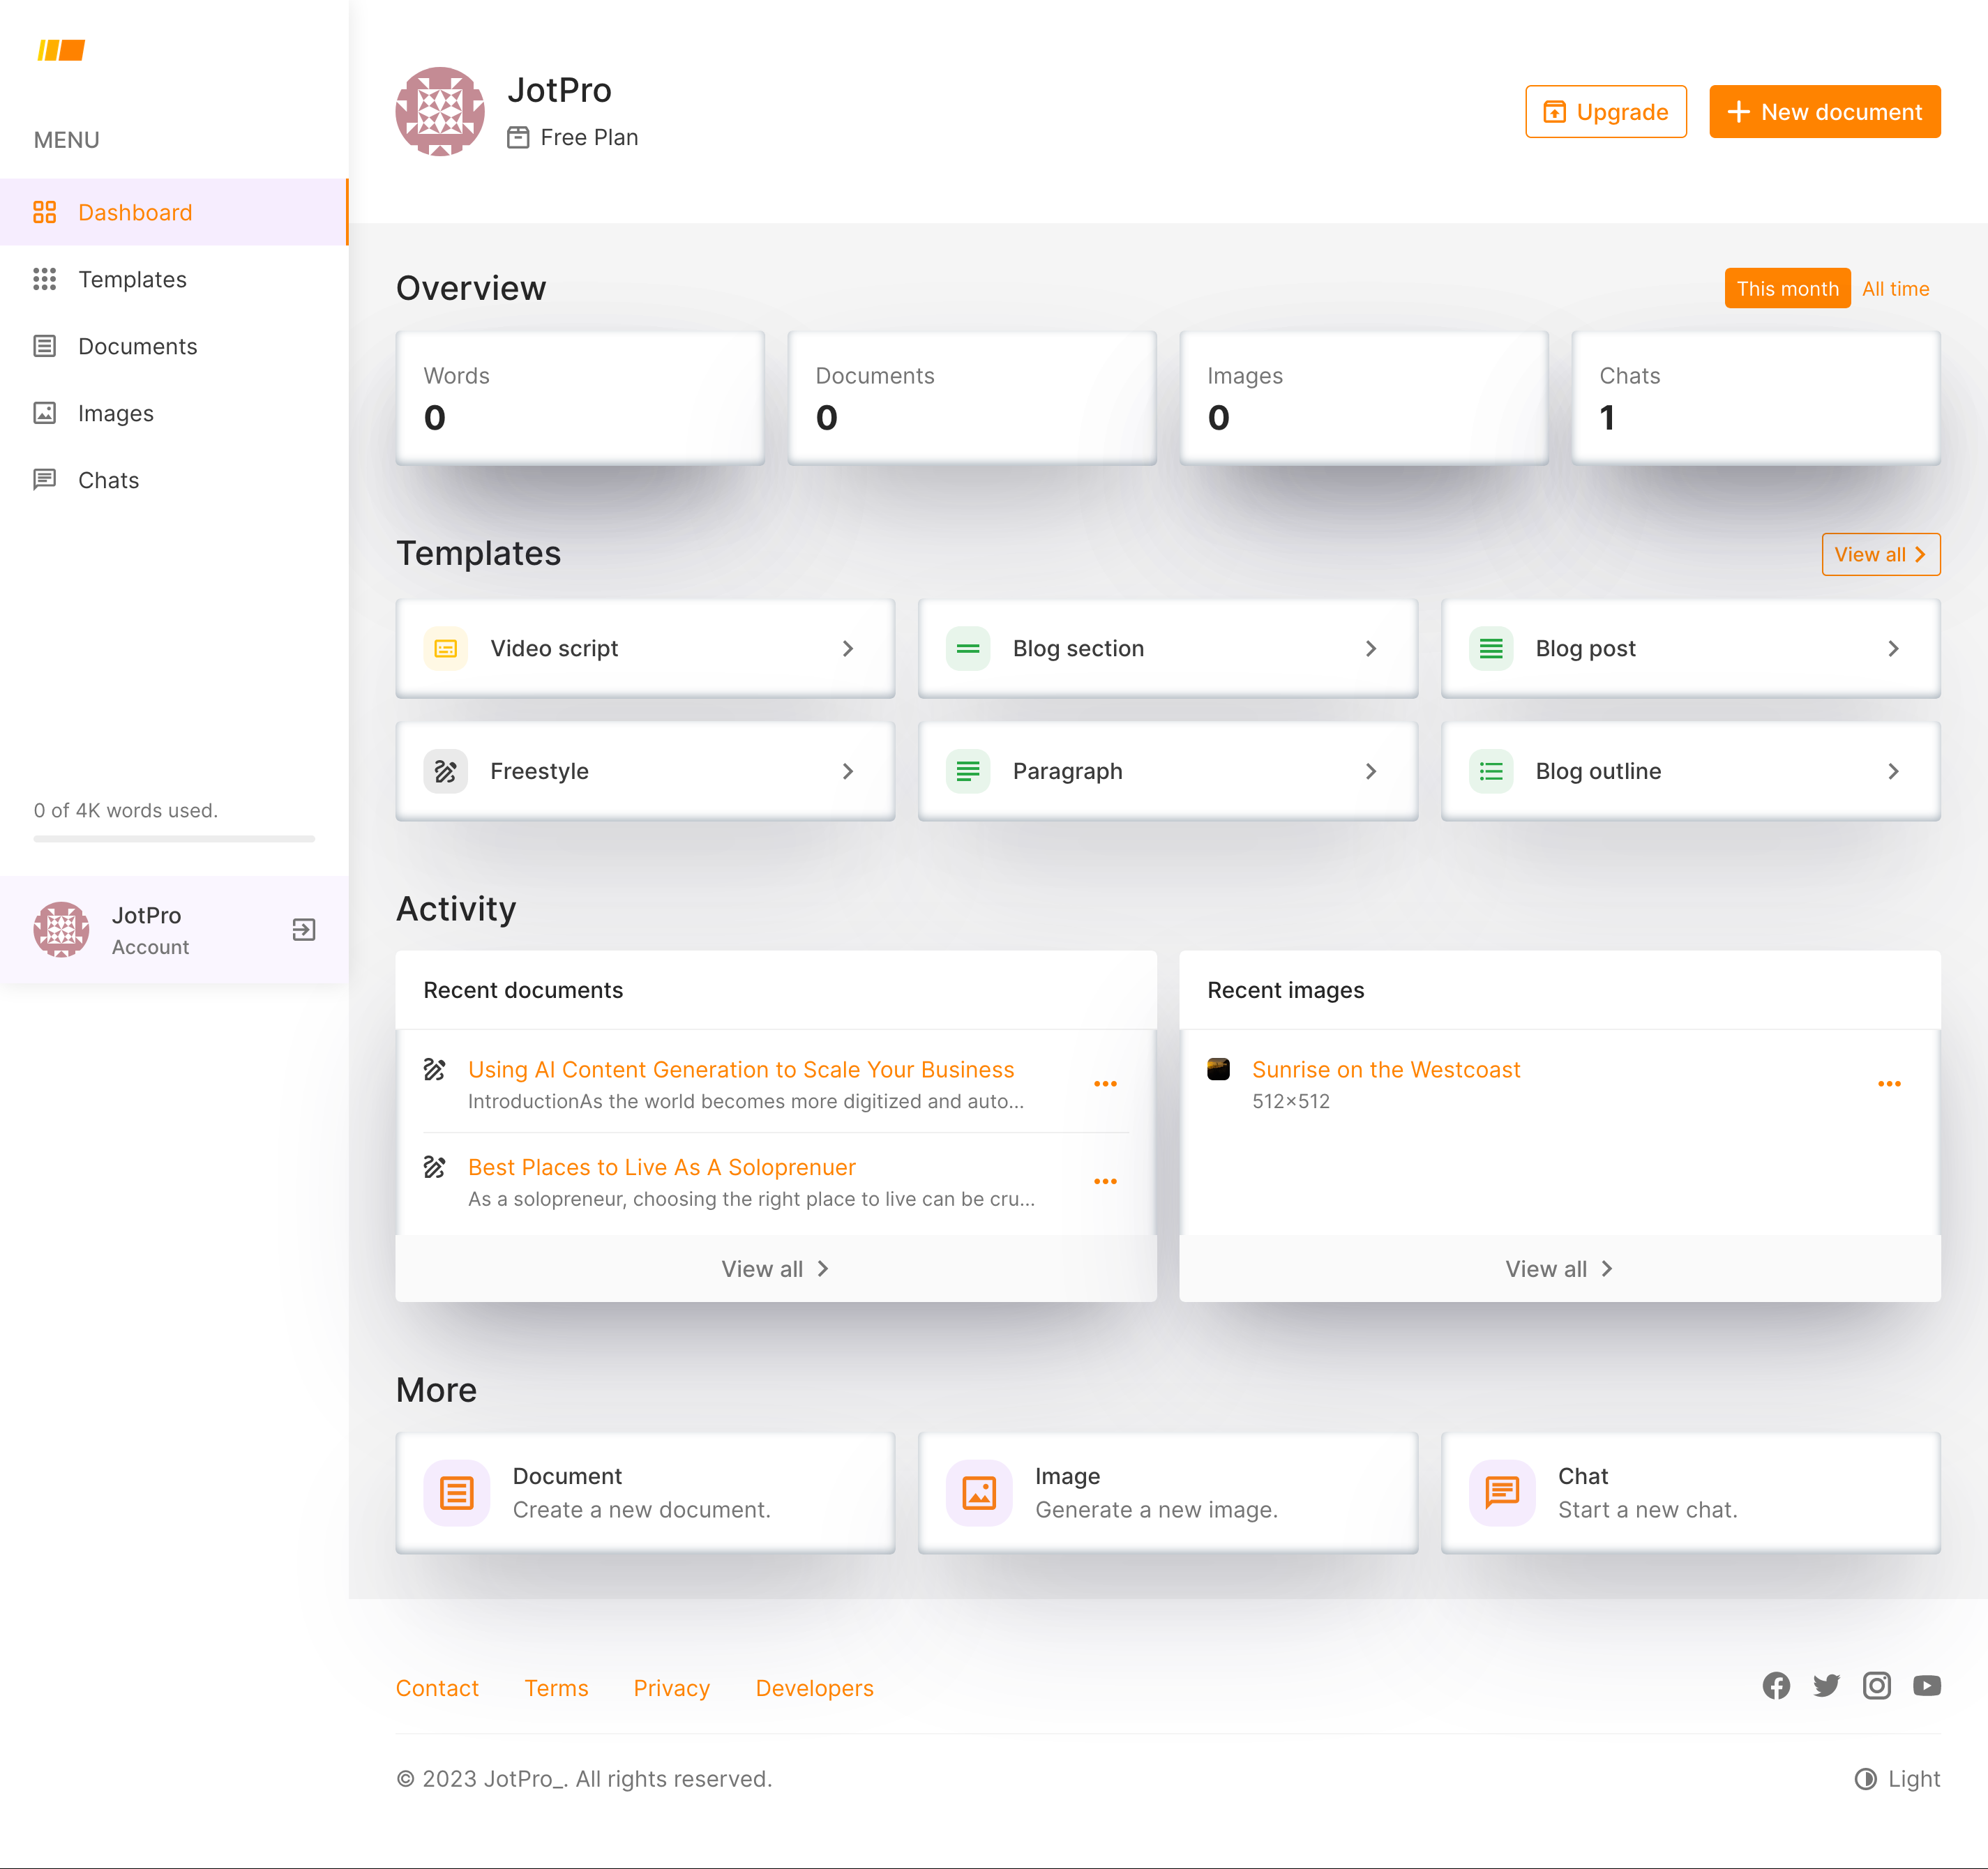
Once you are logged in, you’ll see your personal dashboard — equipped with personalized stats such as number of words generated, number of documents, number of images and chats. You’ll also see some quick links to start writing from a blank document or using one of our specialized templates. The left-hand menu has quick links to access the Dashboard, Templates, Documents, Images and Chats. You can also see how many words you have used as a part of your subscription plan.
Writing With JotPro
Generating a New Document
To create a new document quickly, click the “new document” button at the top-right of the dashboard or click “Documents” on the left-hand menu and click “New”
The benefits of creating a new document this way is you can write a custom prompt to have full Chat-like control and unlimited possibilities for the content you generate.
You can generate a document using the advanced options by clicked “Advanced”:
- Creativity: The creative level of the result
- Variations: The number of variations of the results (1-4).
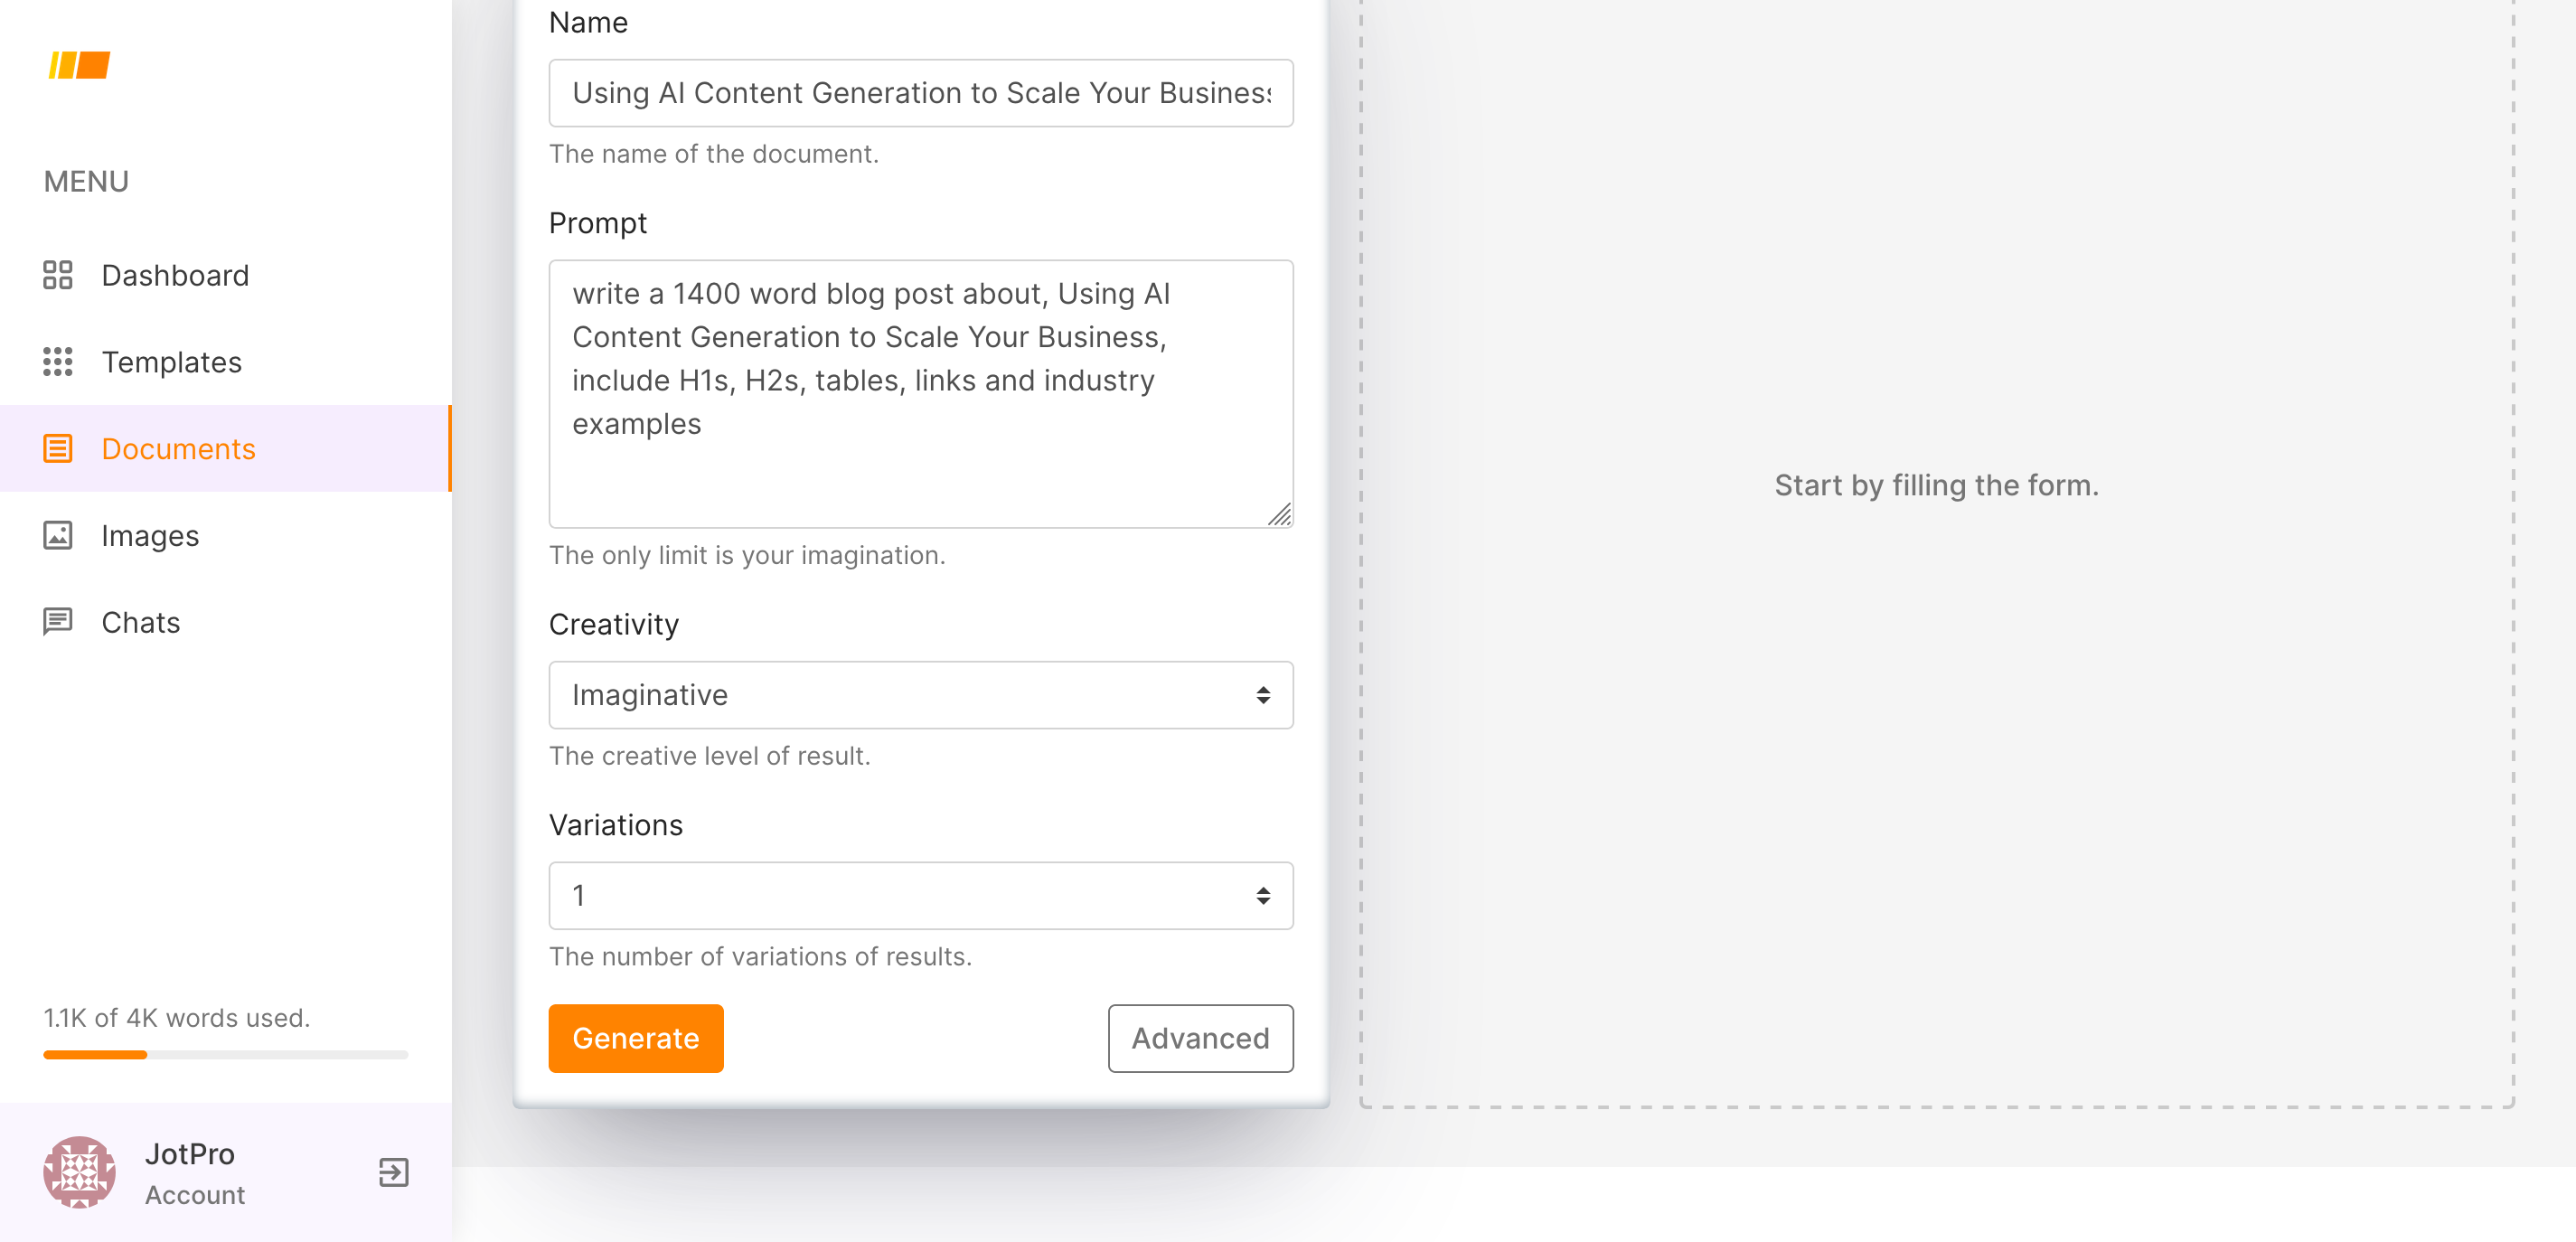
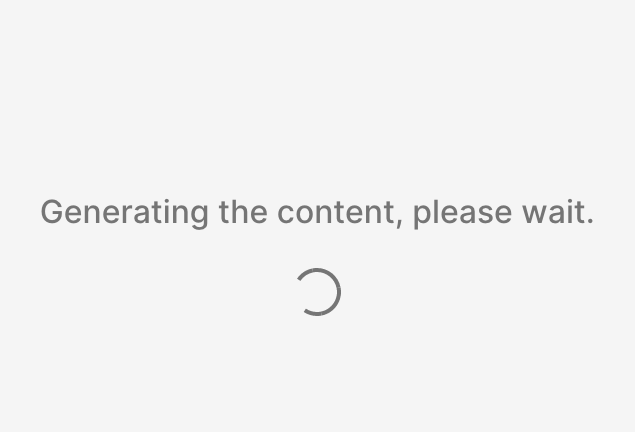
Click “Generate” and wait a few seconds and your new document will be generated.
Once your document is generated and you can copy, view or edit your new document.
Editing New Documents
To edit the document click the Pencil icon at the top right corner.
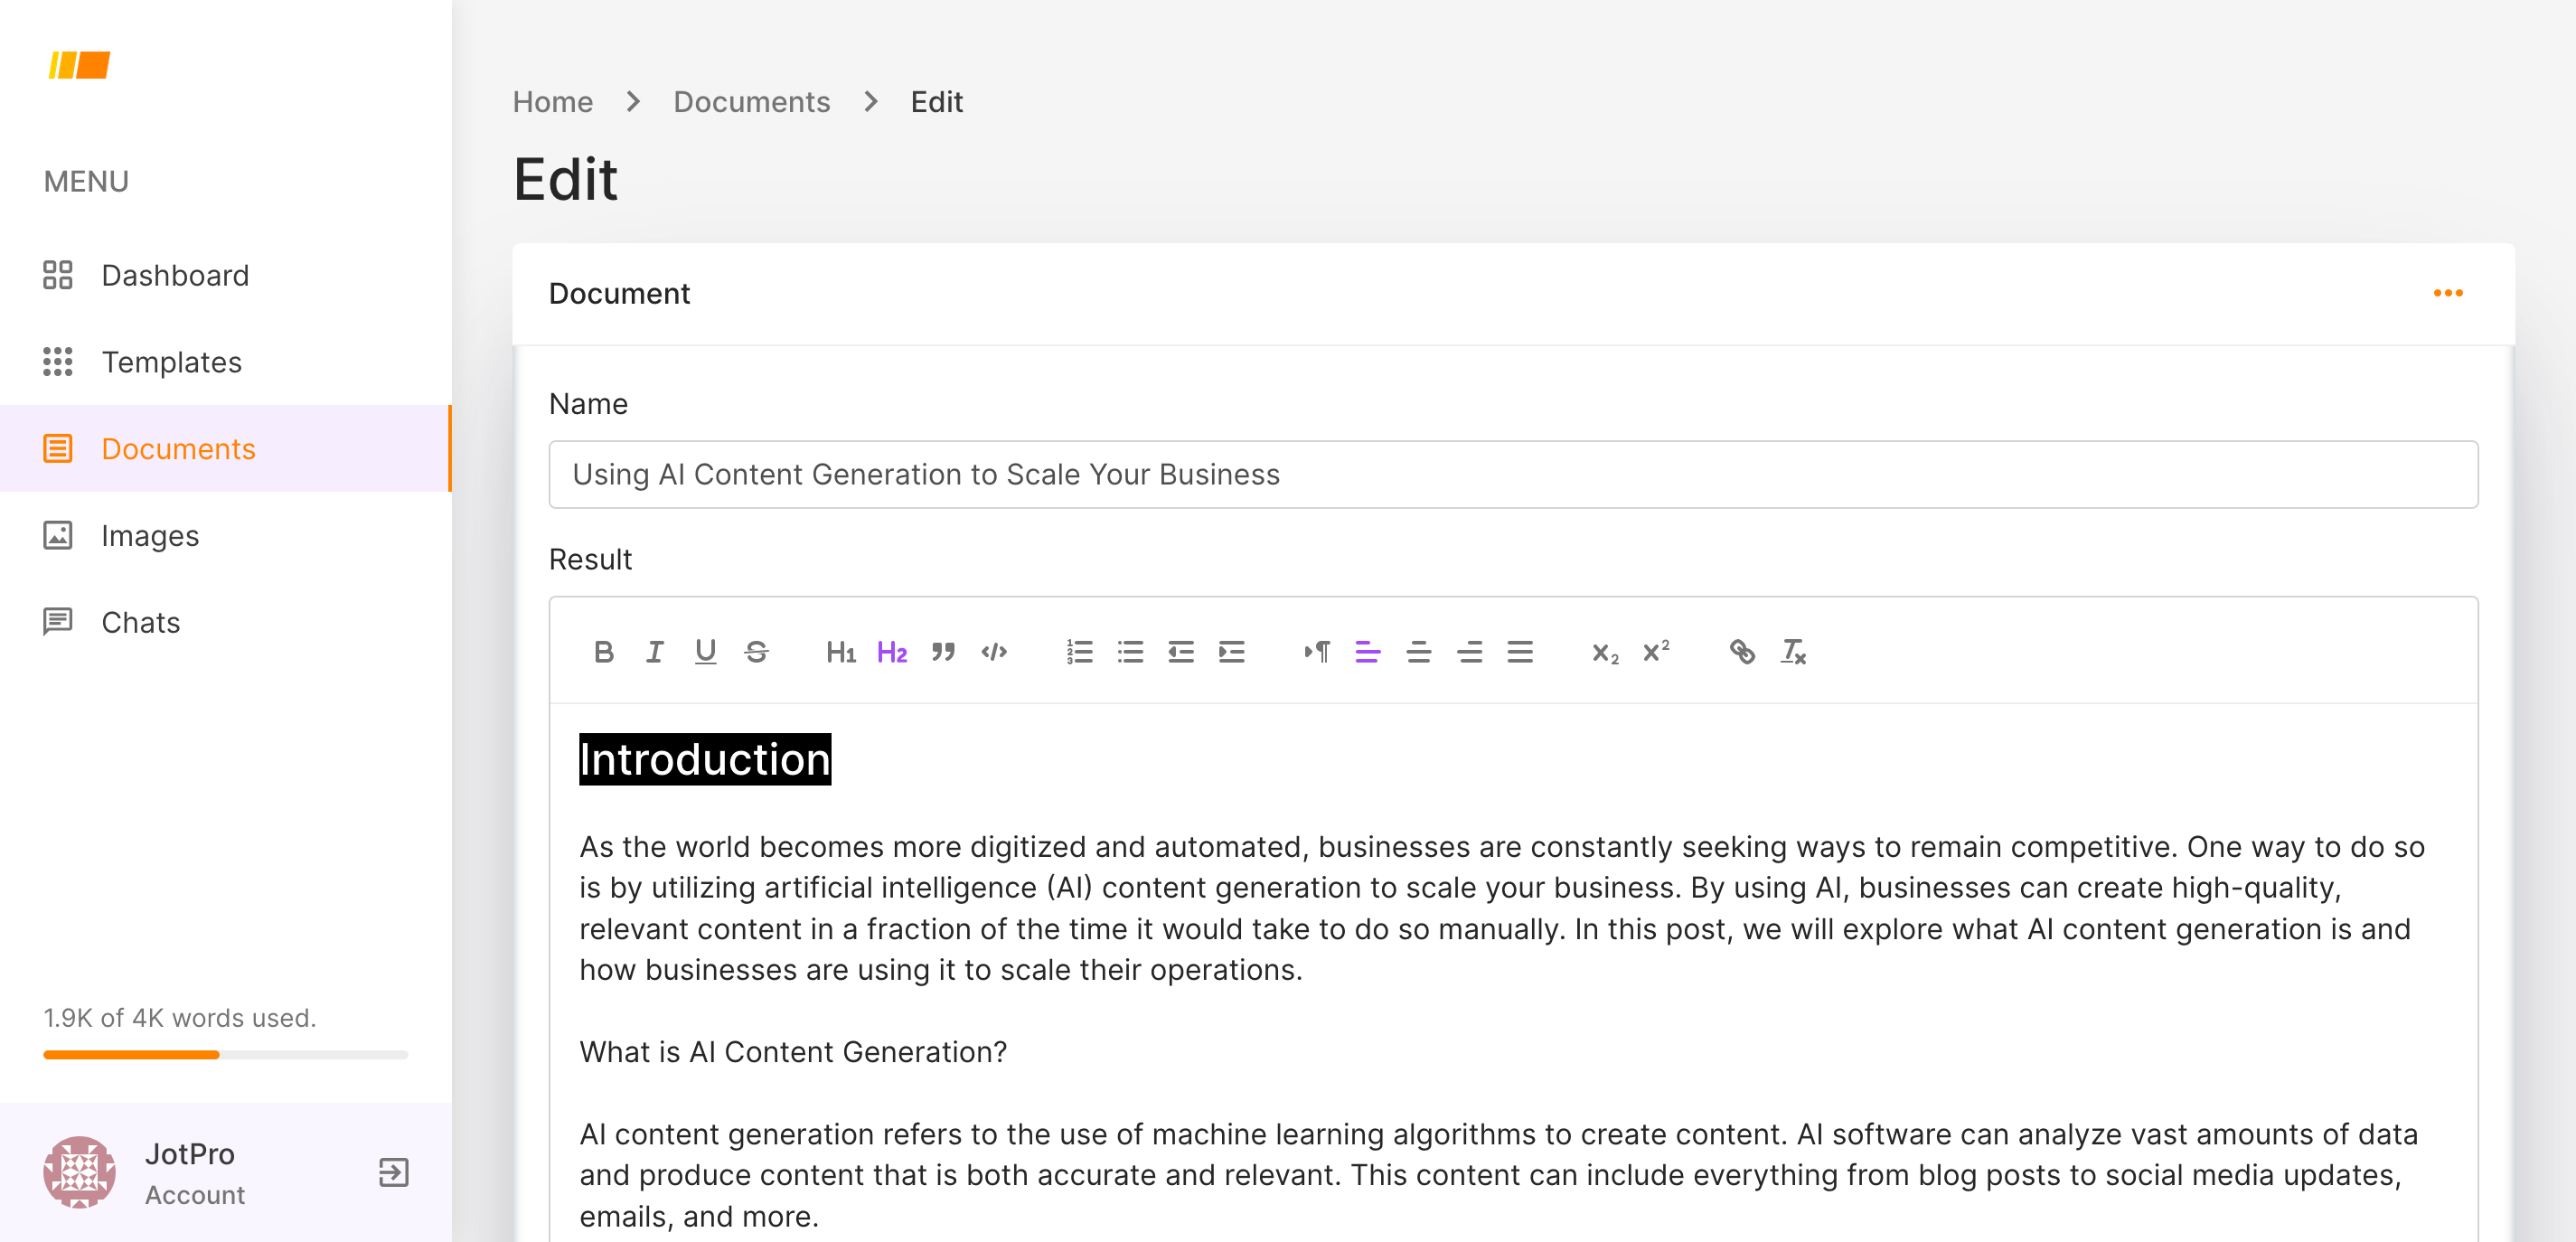
Now you can style your document, add headers, bold text, edit paragraphs, alignment, links and more. Save your work for later or copy and past into your favorite CMS like WordPress.
The text editor is designed so that you can copy and past right into your favorite CMS like WordPress and publish quickly without any styling or formatting issues.
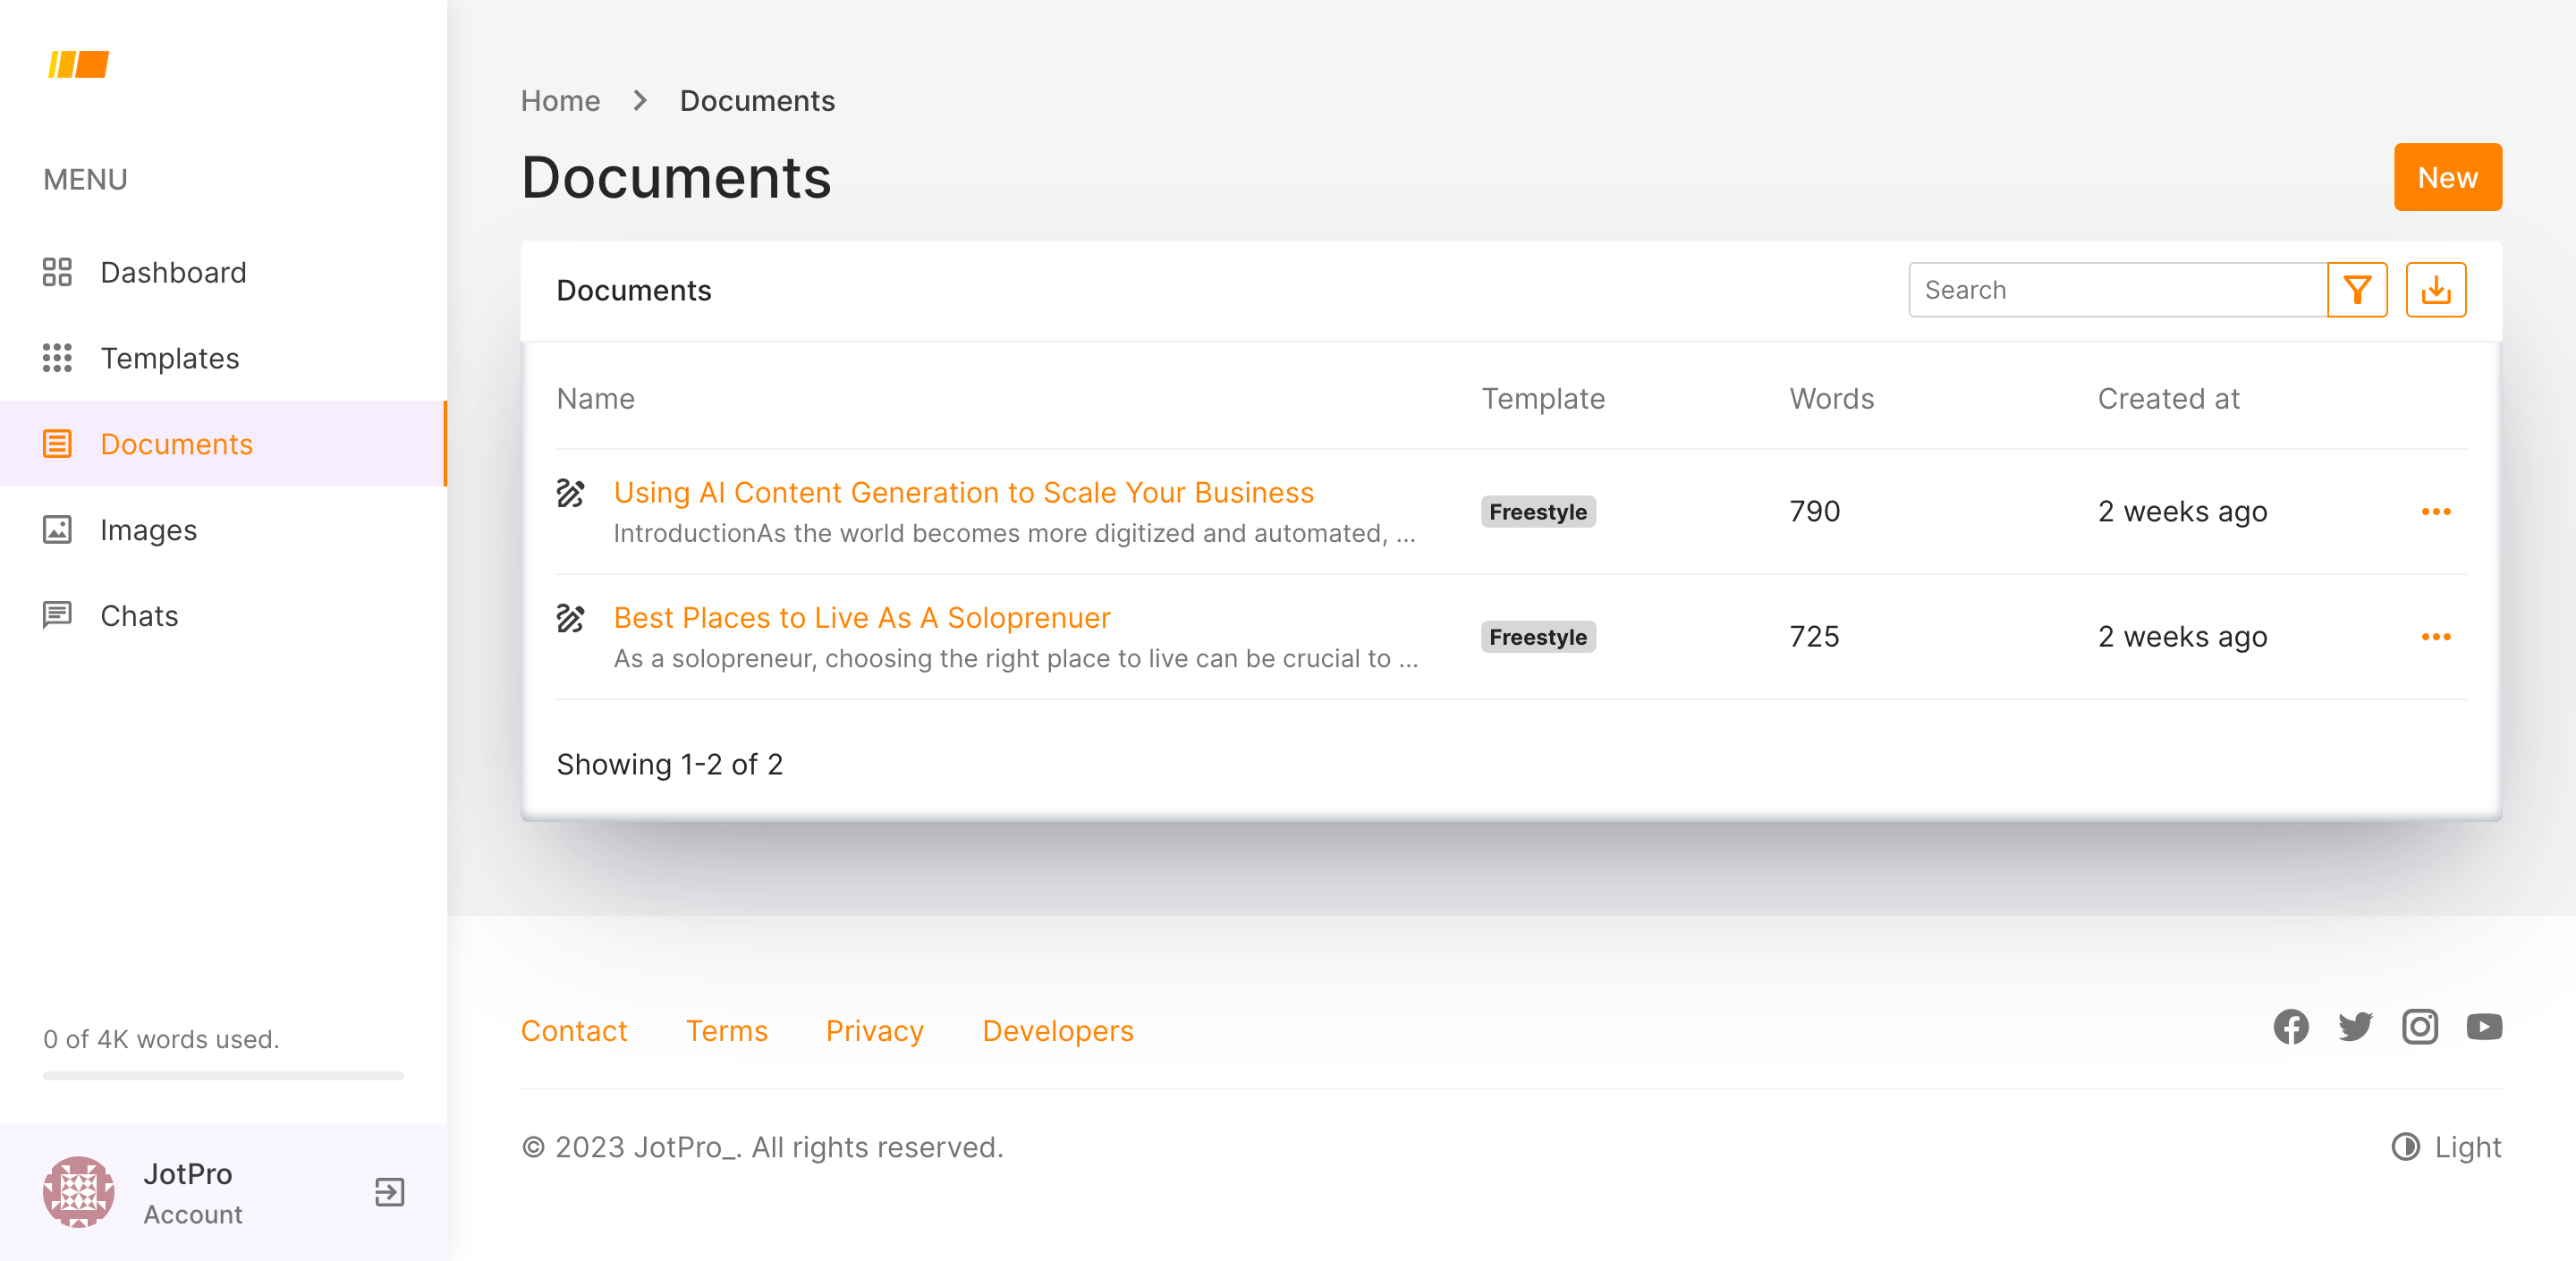
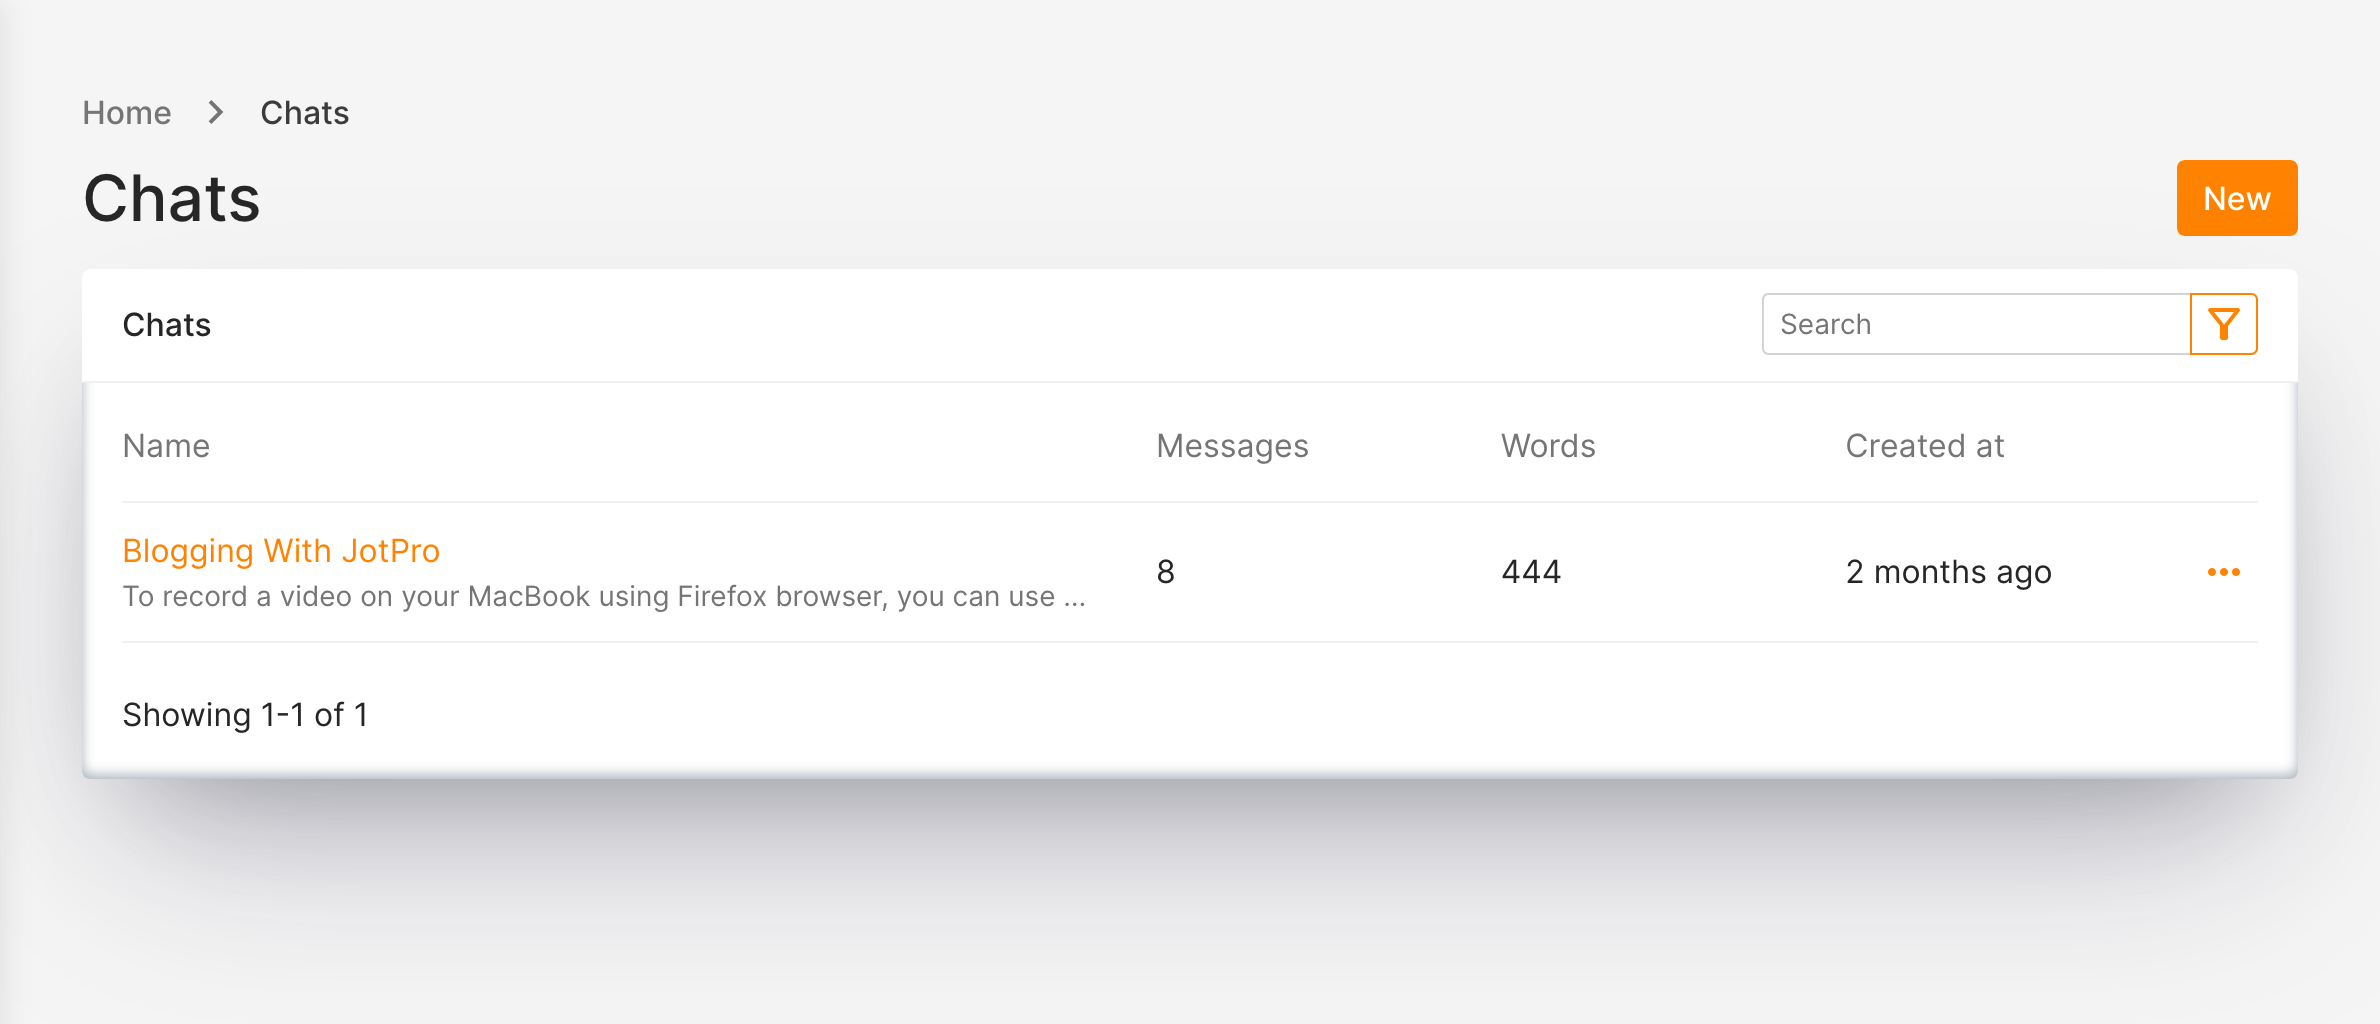
Viewing All Documents
To view all your documents you can click “Save” on the current document or click “Documents” on the left-hand menu.
Here you can see the name of the document, the template used, the number of words generated and time the document was created.
Favorite Documents
You can also favorite documents by clicking “Documents” in the left-hand menu, then clicking the three-dots to the right of the document you would like to favorite, then clicking “Favorite”.
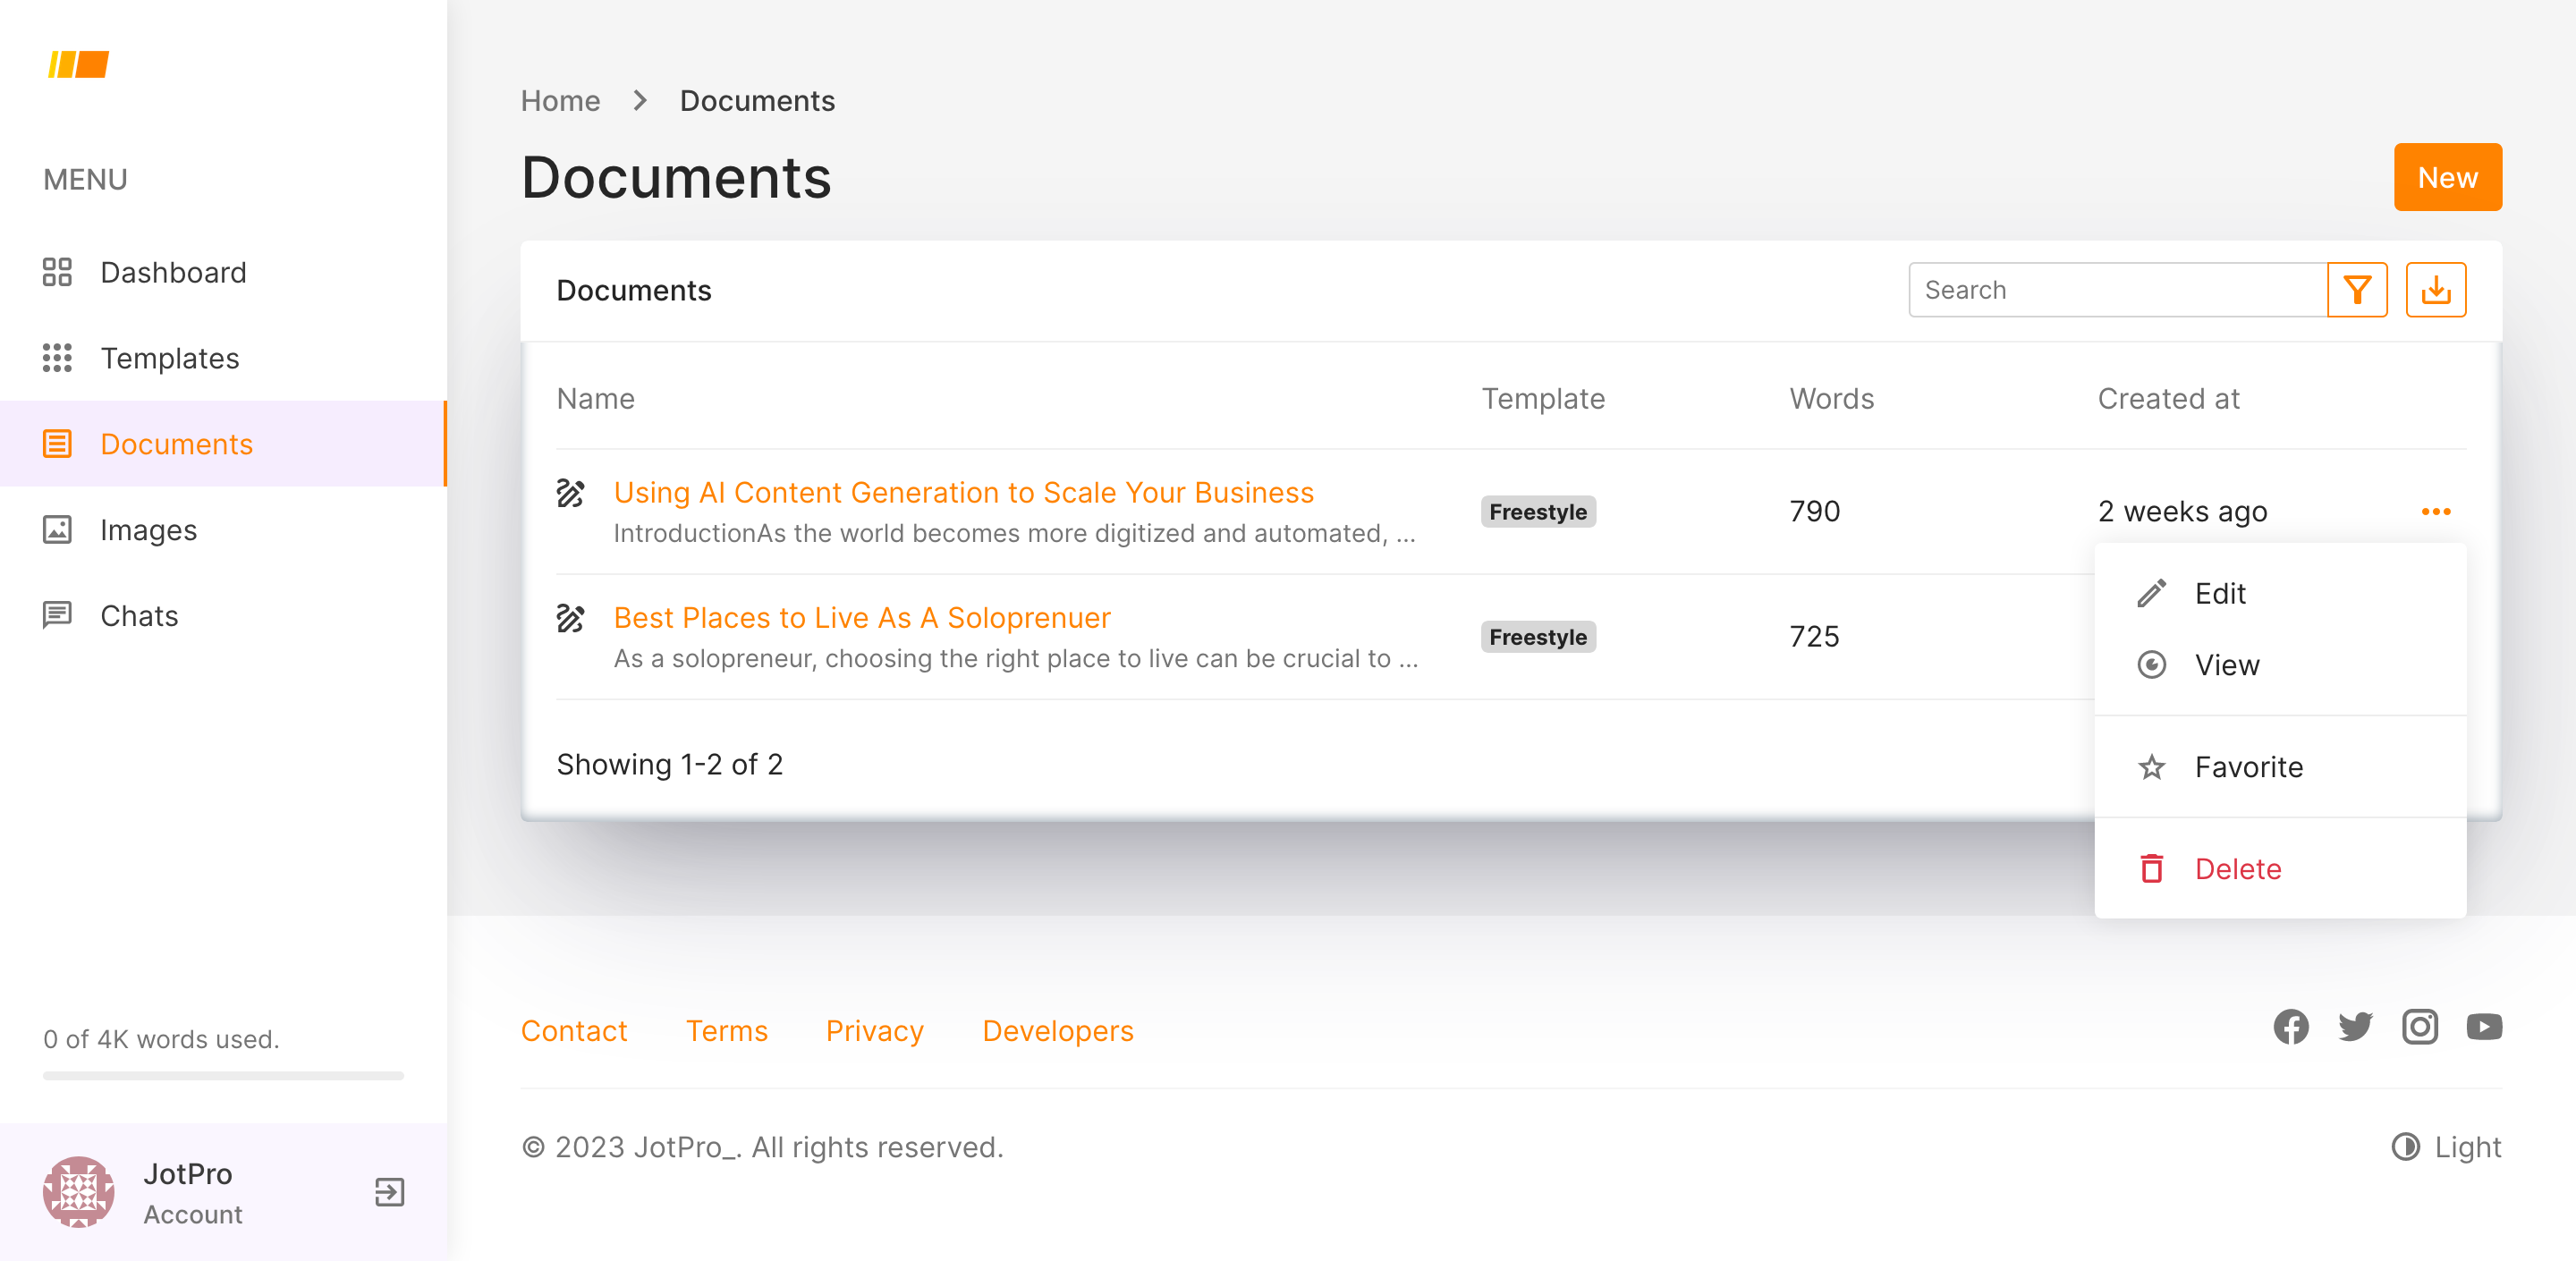
Deleting Documents
You can also delete documents by clicking “Documents” in the left-hand menu, then clicking the three-dots to the right of the document you would like to delete, then clicking “Delete”.
Writing With JotPro
Prompt Writing – New Document Creator
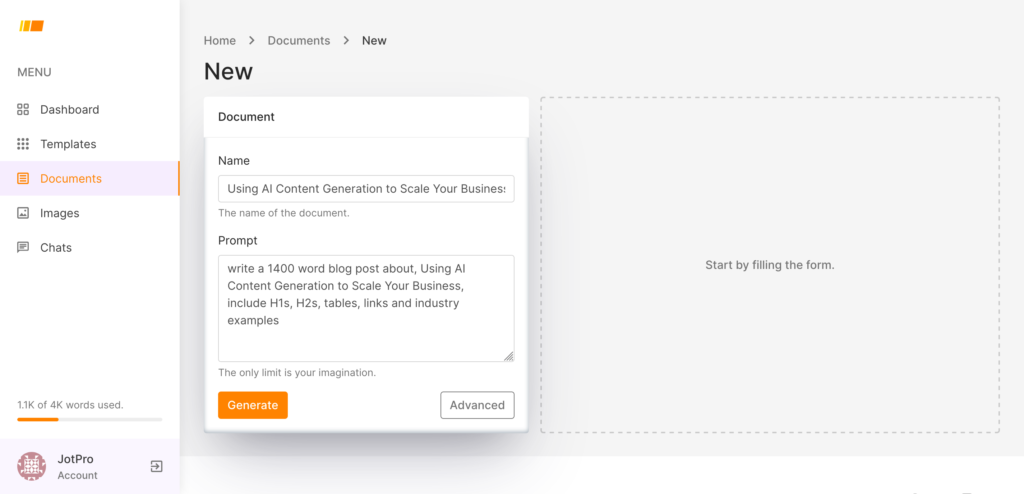
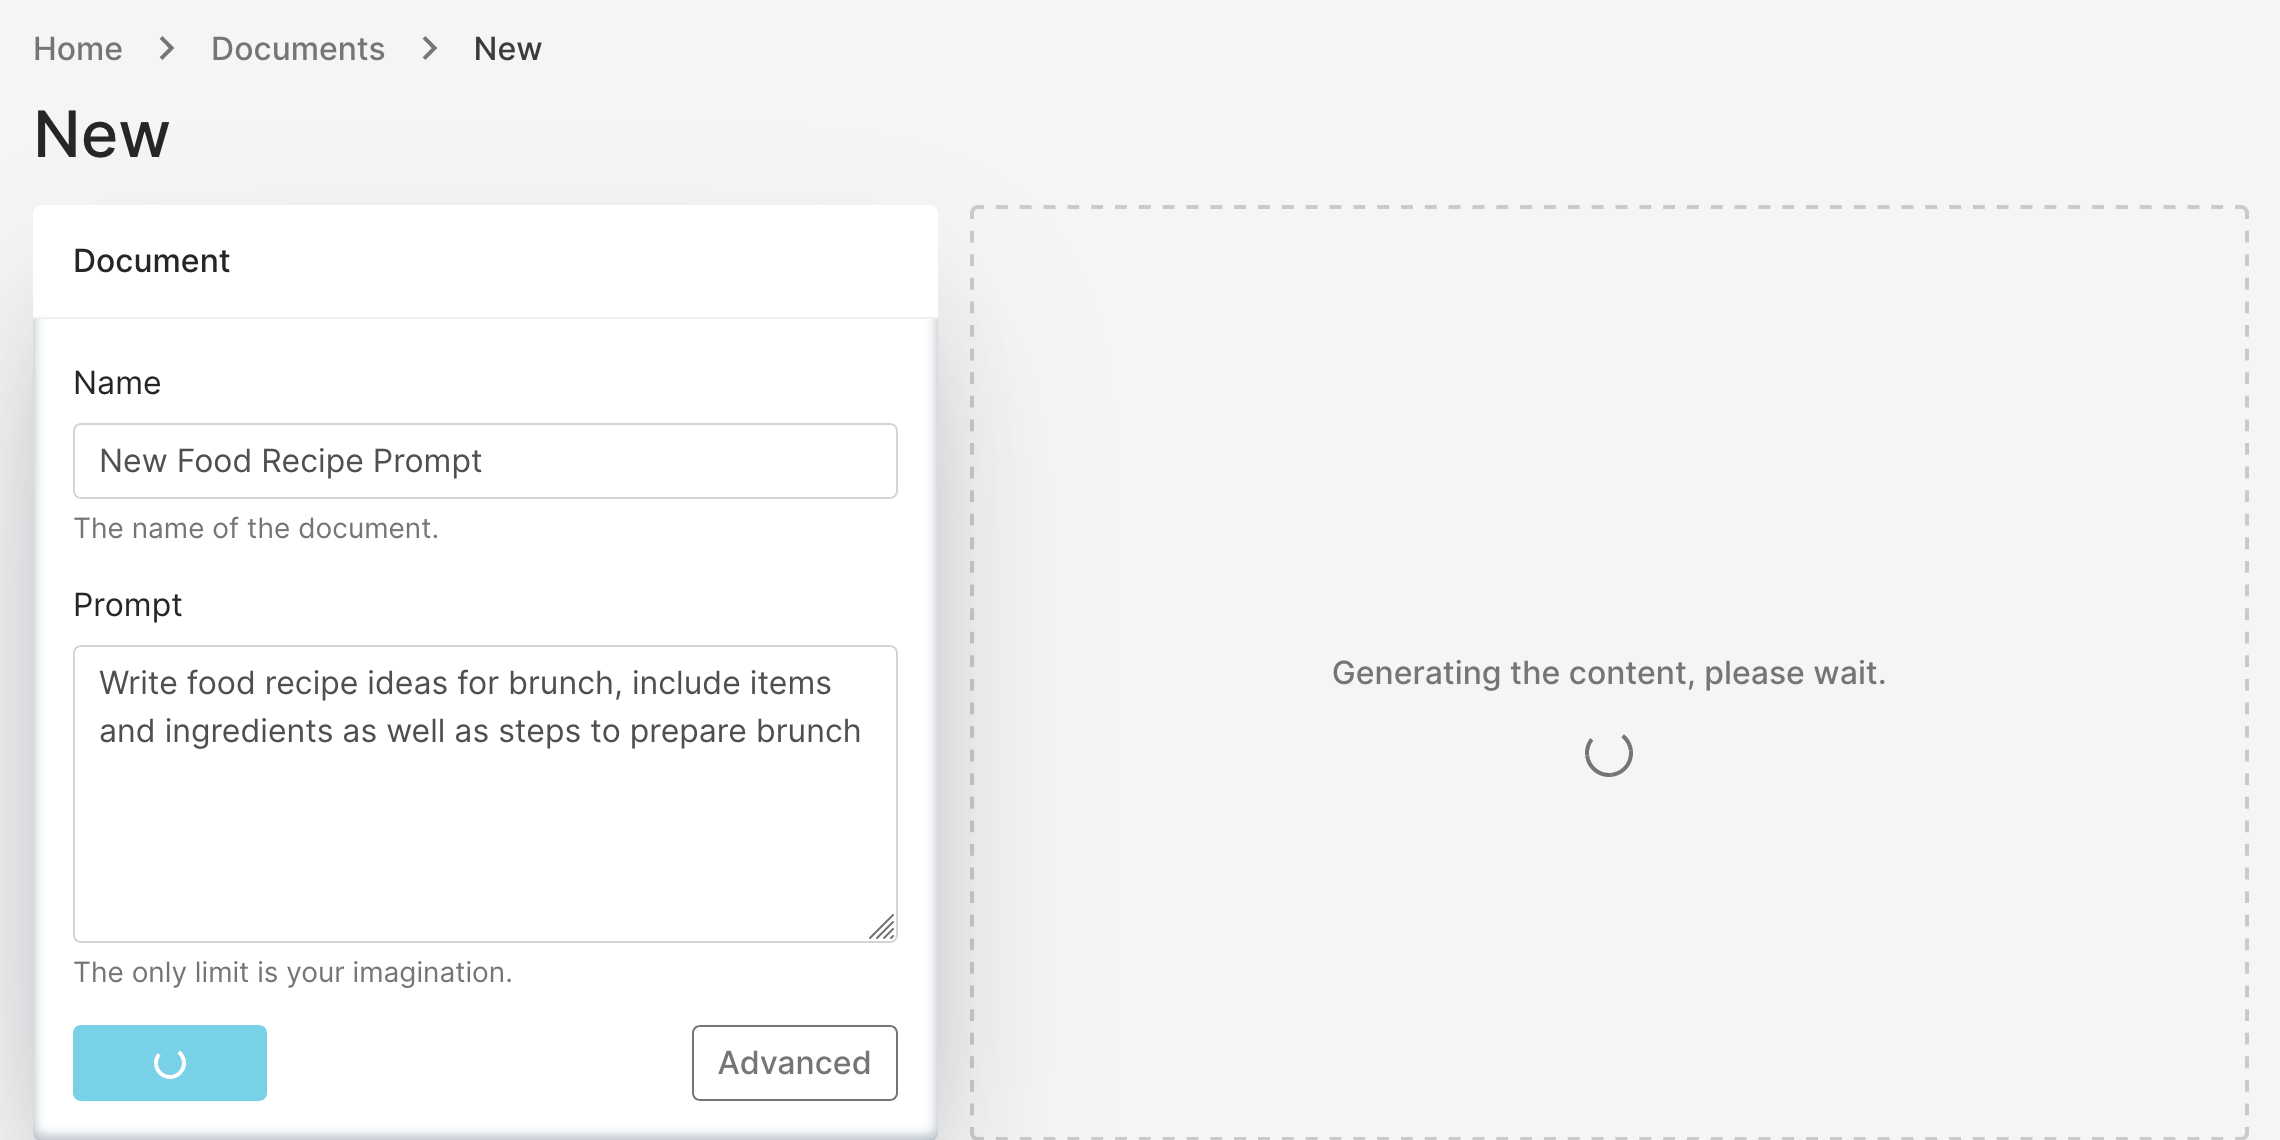
Step 1: To write a custom prompt you can use New Document Creator. Click ‘Documents’ on the left-hand menu. Then click ‘New’ at the top right of the page. You will see the screen below, where you can input the name of your new document and the custom prompt.
You can write prompts like “Generate blog post ideas for a food blog” or “Write a research paper about ocean conservation”. The sky is the limit.

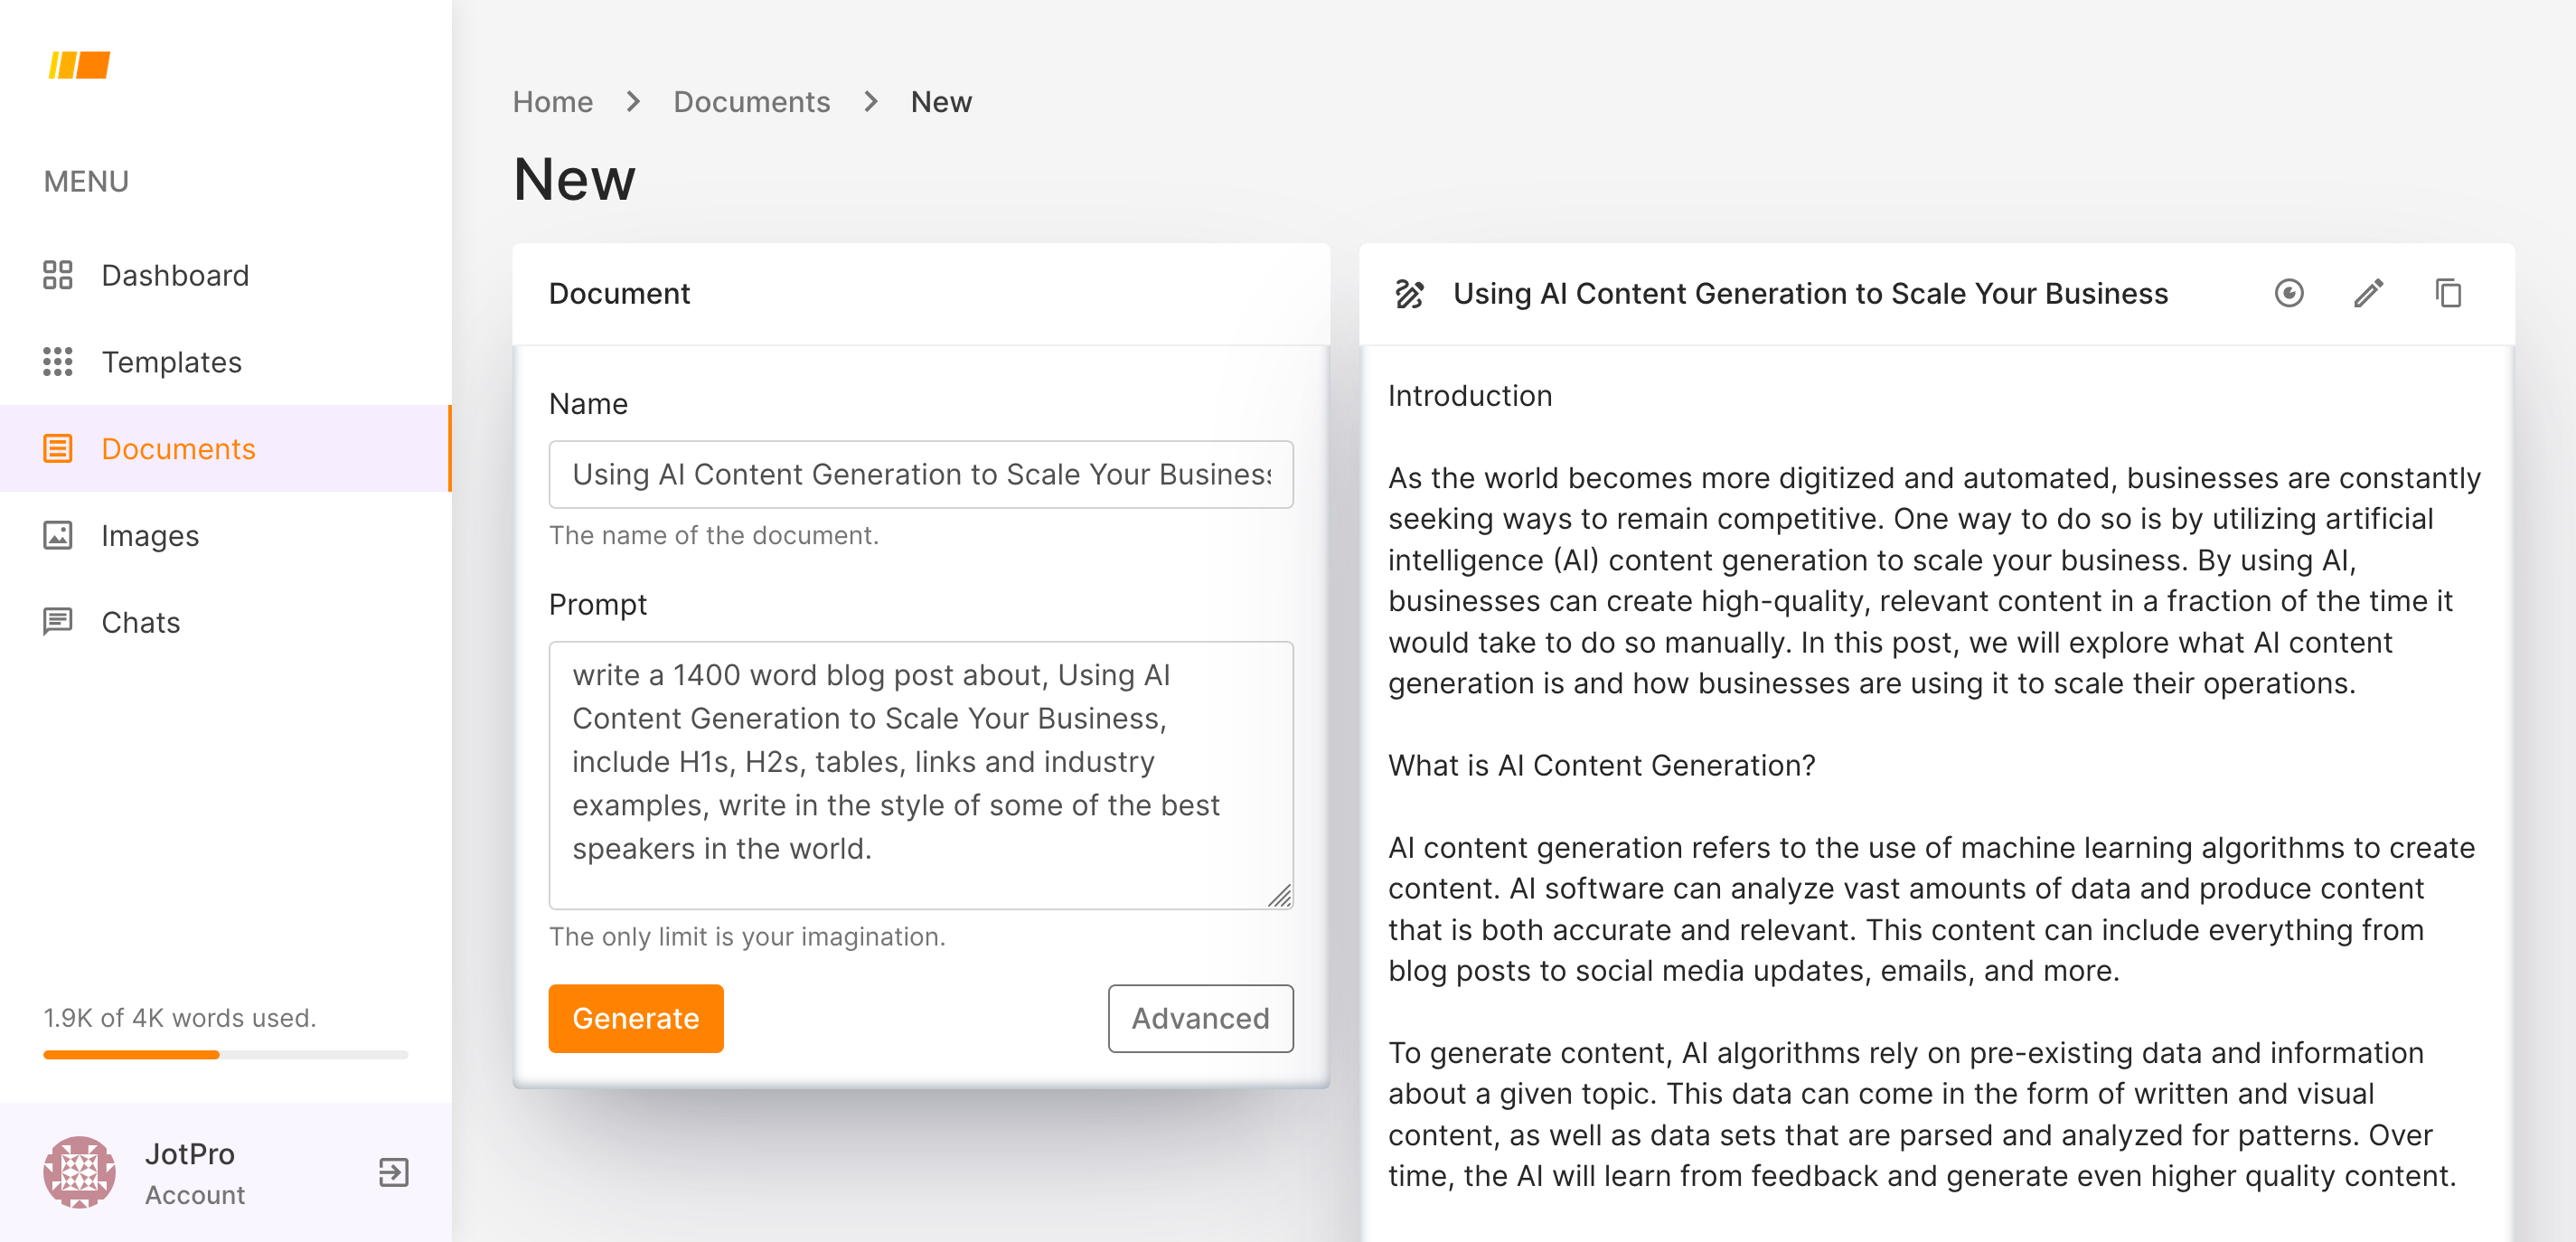
Step 2: Once you have written your prompt, click ‘Generate’ and you wait a few seconds as your prompt generates your new document. You should see the screen below.
Step 3: Once your document is generated, you can copy and paste to wherever you’d like or edit your document. The document saves automatically and can be viewed in your ‘Documents’.

JotPro Chat – AI Assistant
You can also write custom prompts with JotPro Chat, as well as a some other cool things. The Sky is really the limit here. Here is a short list of things you can do with JotPro Chat.
- Prompt Writing: JotPro Chat can help you with prompt writing by providing creative writing prompts, journaling ideas, poetry inspiration, and more. Just ask for a specific type of prompt, and JotPro Chat will generate it for you.
- Q&A Sessions: You can interact with JotPro Chat by asking questions on various topics. JotPro Chat will do it’s best to provide accurate and informative answers based on the data available up to my knowledge cutoff in September 2021.
- Storytelling: Engage in collaborative storytelling with JotPro Chat! You can start a story, and I’ll continue it based on your input, creating an interactive and imaginative narrative.
- Writing Assistance: If you’re working on a writing project, you can seek JotPro Chat’s help for grammar checks, sentence structure suggestions, and overall writing improvement.
- Language Translation: Interact with JotPro Chat to translate text between different languages. JotPro Chat can assist you in understanding and communicating in various languages.
- Knowledge Retrieval: JotPro Chat can help you find information on a wide range of topics, including historical events, scientific facts, and general knowledge.
- Task Management: Organize your to-do list or schedule by interacting with JotPro Chat. JotPro Chat can set reminders, create lists, and help you stay productive.
- Fun and Games: Engage in fun activities and games like riddles, quizzes, and word puzzles.JotPro Chat is here to entertain and challenge you!
- Code Snippets: If you’re a programmer, JotPro Chat can assist with coding-related questions and provide code snippets in various programming languages.
- Personalized Recommendations: Tell JotPro Chat your preferences, and JotPro Chat can suggest books, movies, music, or other things that match your tastes.
Step 1: To start a new chat click ‘Chat’ in the left-hand menu. You will arrive at the screen below.

Step 2: Click ‘New’ to create a new chat.
Step 3: Name your new chat.

Step 4: Click ‘Save’ to save your new chat

Step 5: You should see the message below at the top of your chats. Click the name of the new chat you created to start up your new JotPro AI Chat Assistant.

Step 6: After clicking your new chat, you should see this page where you can start interacting with your new JotPro Chat

Step 7: Start interacting with JotPro Chat, You can write custom prompts like “Write a blog post outline” or simply have a conversation.
Be sure to not put any personal or sensitive information in your jots and know that sometimes information generated is not accurate.

Language
Scenarios and Use Cases
E-commerce Platforms
For e-commerce platforms that serve a global audience, the ability to change language settings is crucial. It allows customers from different countries to navigate the site in their native language, improving user experience and potentially increasing sales.
Customer Support Services
Customer support services can benefit from language change features by offering support in multiple languages. This can be particularly useful for businesses that have a diverse customer base.
Educational Platforms
Educational platforms can offer courses in multiple languages, making them accessible to a broader audience. Students can easily switch to their preferred language for a better learning experience.
Travel and Hospitality
In the travel and hospitality industry, offering services in multiple languages can be a significant advantage. It can attract a more diverse clientele and improve customer satisfaction.
Step 1: Navigate to Templates and Create a New Document
In the first step, you’ll need to navigate to the “Templates” section of your platform or application. This is usually found in the main menu or dashboard. Once you’re in the Templates section, select any template to create a new document. This will serve as the foundation for your new multilingual document.

Step 2: Select Advanced View
After creating a new document from a template, you’ll typically be taken to a basic document screen. To access more features, including language settings, switch to “Advanced View.” This is often found in the bottom right corner. Advanced View will provide you with more customization options for your document.

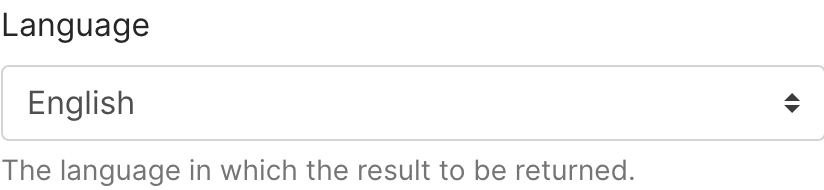
Step 3: Select New Language
In the Advanced View, you’ll see a dropdown menu or a list of available languages. Select the language you want your document to be in. This will enable the platform to generate text in your chosen language.
Step 4: Fill in the Details to Generate your Document
With your language selected, you can now proceed to fill in the details of your document. This could include text fields, images, and other elements that make up your document. Make sure to review each section carefully to ensure that all information is accurate and formatted correctly in your chosen language.
Step 5: Generate Your New Document
Once all the details are filled in and you’re satisfied with the preview, look for the “Generate” button, usually found at the bottom of the page or in a toolbar at the top. Clicking this will create your new document in the language you’ve selected.
You’ll then have the option to download, share, edit or print your newly generated multilingual document.

Creativity Level
Scenarios and Use Cases
Visual Arts
Visual artists can benefit from adjusting their creativity levels when working on different pieces. For example, a “High” creativity setting might be ideal for abstract artwork, while a “Low” setting could be suitable for more precise and realistic illustrations.
Content Creation
Content creators, such as writers and marketers, can use creativity settings to tailor their messaging. A “Conservative” setting may be suitable for formal business content, while a “Wild” setting can be perfect for crafting engaging social media posts.
Product Design
In product design, creativity settings can impact the ideation phase. Designers can explore a “Medium” creativity level to strike a balance between innovation and practicality when developing new products.
Education
Educators can use creativity settings to adapt their teaching methods. For a creative writing class, they might encourage students to set their creativity level to “High” to foster imaginative storytelling, while in a technical course, a “Low” setting can promote clarity and accuracy.
Step 1: Navigate to Templates and Create a New Document
In the first step, head over to the “Templates” section within your application or platform. This is usually accessible from the main dashboard or menu. Once you’re in the Templates area, select any template to create a new document. Clicking this will initiate the process of generating a new document, which you can then customize to your liking.

Step 2: Select Advanced View
After creating a new document, you’ll likely find yourself in a basic editor with limited options. To unlock more advanced features, including the ability to adjust creativity levels, switch to “Advanced View.” This option is usually located in the bottom corner of the box. Advanced View will provide you with a broader range of customization options, including the ability to adjust creativity levels.

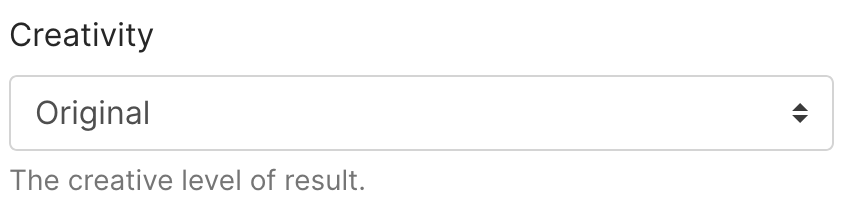
Step 3: Select Creativity Level
Once you’re in Advanced View, navigate to the section that allows you to adjust the “Creativity Level.” Here, you’ll find a slider or a set of options that let you adjust the creativity level of your document. This could range from “Repetitive” to “Imaginative”. Select the level that aligns with the creative needs of your project.
Step 4: Fill in the Details to Generate your Document
With your desired creativity level selected, you can now proceed to populate your document. This involves filling in various fields, adding text, and so on. Make sure to review each section carefully to ensure that all the information is accurate and that the creativity level you’ve chosen is effectively applied to these elements.
Step 5: Generate Your New Document
After you’ve filled in all the necessary details and are satisfied with the preview, it’s time to generate your document. Look for a “Generate” button, usually located at the bottom of the page or in a toolbar at the top.

Clicking this will finalize your document, applying the creativity level and other settings you’ve chosen. You’ll then have options to download, share, or print your newly generated document.
